During the lessons, we talked about the principles of animation once again – mainly focusing on the easing and keyframes. We then tried out some simple after effects techniques such as moving and morphing shapes using keys.
To establish characters, we also looked into shape languages from Disney to further communicate personality to the audience. But personally I believe that a good mixture of these shapes would accentuate personality further.
After Effects Tests:
These are the first few test that I made in the first 2 lessons. It was interesting how just altering the movements and the speed of the ball could define the weight so easily to us. This was also simple enough to achieve for a person who has never used After effects.
Exercise: Drawing an emotion with 3 shapes
I picked sluggish and laziness – which made me picture droopy liquid that is difficult to pick up.
Experimenting with the sketched out shape:
Since I was still practicing, I just tried to get the shapes and layers as accurate to my sketch rather than figuring out a movement. But just changing the path of the shapes to make it droopy conveys the emotion quite well with just 2 keyframes.
Drawing a cherry as practice:
I was quite proud of this cherry I made, so despite it just being a side practice for the class to just delete later, I decided to keep this for the brief we’ll get from this rotation. I really liked my improvised colour scheme and the way I drew my cherry.
During the week, we analyzed different types of compositions and storyboards to aid us in formulating our own little story. Within the rotation, we made 2 different stories.
Cafe dispute storyboard evaluation:
For my longer storyboard, I personally enjoyed the story concept. I drew each frame consecutively without much precise planning. Since my cafe dispute is a literal argument, it’s much better to figure out the flow of what’s gonna happen next – which worked quite well. It was quite difficult to have more abstract experimental things going on within my story without having the readers be confused. Following the brief, I stuck to very simplistic character designs with basic shape language just for the readers to differentiate who is who. That made me focus more on the compositions and camera angles than the characters themselves.
For what went well, I think that the use of colors in monotone really helped to bring out the form of the characters from the background. It really helped to establish the bursts of colors and energy when it went into the imagination phase. I think that if I managed to animate this, I could even stick with the color palette I used within the storyboard itself. I also liked the use of arrows within my scenes just to show the flow of the camera if it’s not static.
To improve, I think I should’ve made the frames similar to the aspect ratio I’m working with, and keep them mildly consistent – since when I tried to make an animatic out of the frames, it was really difficult to line everything up in the same position. When I was getting feedback from this storyboard, I didn’t get much feedback on improvements due to time, and the ones I got were quite positive.
3 panel storyboard evaluation:
For the 3 panel storyboard however, I got some feedback where I should redraw the middle frame with the boy and the child, since the boy pointing made it feel like the camera pan-ed over to the boy’s perspective rather than them growing further. Overall, I think these simplistic story panels where nothing much changes makes the viewers focus more on the little changes that happen rather than the complexity of the scene.
I have improved this storyboard with a second draft, where instead of pointing in a direction, the boy is just pulling on the mother’s shirt. I also changed the colours within the storyboard so that it’s more clear with the background through using complementary colours rather than mixing up a colour palette with similar tones from one another.
Overall, I really love the storyboarding process and hope to somehow turn my storyboard into an animation of some sort.
Feedback I noted down during the presentationRefined Storyboard
I made a concept art for them to make into an animation/animatic. Although I’m not sure if I would finish it during the time before submitting the assignments.
[I’ll keep updating depending on whether I continue this idea]
For this assignment, we were tasked to take 10 pictures of our surroundings that didn’t belong to us.
I decided to document pictures of the newspapers abandoned on the train. During my transports to University, I noticed how there were newspapers in the tube everywhere – despite never seeing anyone read them. It didn’t seem like it belonged to anyone, since if they were bought, they should’ve been taken with their rightful owner. I haven’t seen newspapers sold anywhere either so it was a mystery that they are even there.
As I kept capturing random encounters of these papers, I started to catch some glimpses of the headlines, and reading what generally had happened within that day – and documents history in some form or another.
During the discussion of my pictures, Jane noted that I could take this on further and make it into something more meaningful. Something that can spark either a historical or political statement.
In the moving image aspect. I envision something experimental, with the flashing headlines within the newspaper, or where the images within the paper becomes alive. Another idea that I’ve brainstormed was to actually take these newspaper, and cut them up into a DADA poem. This idea was based off of the previous discussion we had within the class with David Bowie’s song machine BBC NEWS SITE that spews out random words to turn into a song. We came across this topic when talking about Marcel Duchamp’s “Fountain” (1917)
Overall, it was quite an interesting take on an idea I can pursue later onwards in the future once I have the techniques and tools to visualize my idea.
Within the first 30 minute session drawing, I was focused on capturing the expressions and facial features of the person. I found out that just blocking out shapes and shading really helps with that. During the drawing, I was sitting a floor up, and looking down – thus only being able to see small details. It was quite helpful in helping me get the main shapes down.
When we moved onto more drawings that have potential for a “narrative”, I went into Southbank near the station, sat at a near-by cafe/office thing, and started drawing people who were dancing. It was quite a fun experience, since I got to draw natural poses and also some rapid ones too.
Figuring out the 3 panel sequence I’ll use:
I decided to go for the mother and child storyline since I came up with quite a cute storyline for them. (where we watch them grow older in just seconds). I was inspired by “UP” within their montage sequence of them growing old together – but just a condensed version of it.
Personally, I feel like I went overboard with the colours, and thus made it murky and distracting. It also makes the whole atmosphere feel more sinister rather than wholesome.
Feedback and response on this will be on the next post:
<> Storyboard with 20-60 panels <> Scenario should be 2 people in a cafe having a disagreement <> Can use stickmen
My finished storyboard:
Page 1Page 2Page 3
<- This is extra content that I couldn’t fit into the narrative. But it was to establish more personality within them.
My first draft:
Page 1 of 3Page 2 of 3Page 3 of 3
I mainly drew each panel in a flow, rather than figuring out a start, middle and end – which worked quite well. I did get carried away and colored in my storyboard, but it made it a bit more better.
For our first class in storyboarding, we mainly looked into different compositions and shots used for different moods and scenes. We also looked into shape language of the characters and the environments around them.
These are the notes I made during the presentation.
Storyboard Exercise:
We had a mini exercise where we draw a panel of one of the prompts written in the presentation, and I chose “A surprising discovery”.
I interpreted the discovery to be something pleasant, thus setting the scene with some subtle clues of where the characters are (in a birthday party) I used the worms eye view bottom view to create a visually interesting piece. Based on the feedback however, I think I could definitely improve by showing the character’s expression and energy of the “surprise” before getting to the scene that I drew. (which I kind of sketched out in the 2nd panel after that).
QUICK PANORAMA LIFE DRAWING EXERCISE:
4 panels of my classmates within the class
These are quick sketches of my point of view within the class, it was very interesting how I couldn’t exactly fit everything I see on the page or else it’ll be cramped up. In a way it felt like capturing a fragment of what I see in a viewfinder. Other than that, this exercise was quite fun and eye opening. If I had more time I would’ve definitely developed on it more.
In this post, I will document the creative process of this project and have the evaluation and feedback reflection in the next post.
SKETCH BOOK PAGES OF THE CREATIVE PROCESS:
Covered up sound no.4 responsePage of sounds (and some staging plan from the team and thumbnails).
Material experiment, timings, thumbnail sketches and original response to the soundGetting the brief idea of which shapes to cut:
After getting the specifics of the brief, I sketched out thumbnails of the imagery I was envisioning for this sound. (The brief summary is in the Week 1 post). I went with a star since the original café sounds rough, spikey and overall chaotic – and I thought sharp edges can convey it visually.
After picking out of the thumbnails, I planned out the timings through writing and with an animatic sequence. Since I’ve worked with stop motion before, I wanted to try out something more experimental for this project – thus even though I have a general understanding of the pieces I need to cut out, I also kept it very loose so that I can improvise and try things out during the shooting day on Monday.
Animatic to check the timings for each object
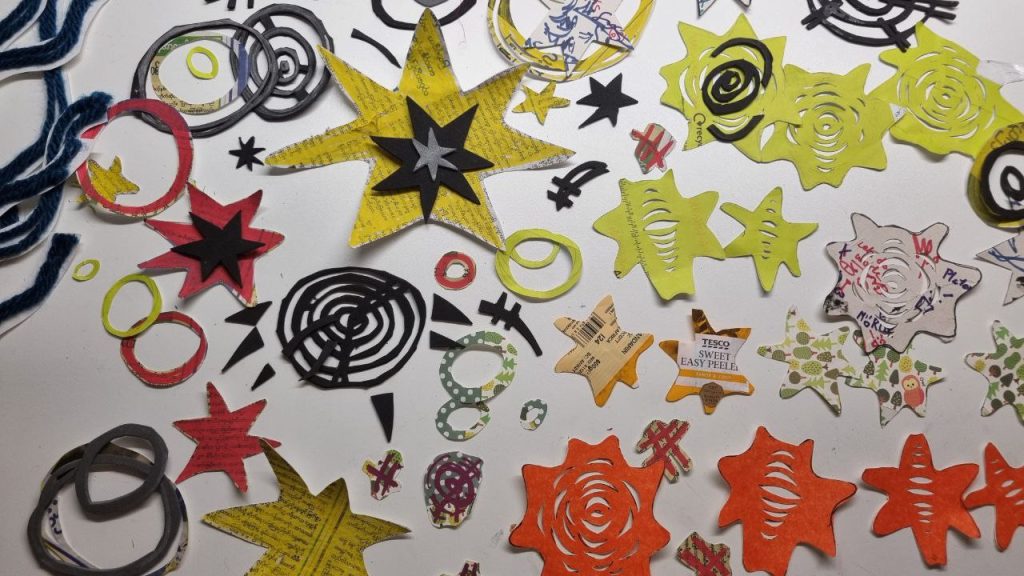
CUTTING THE PEICES TO ANIMATE:
Process of cutting the pieces out
I used an array of recycled materials and colored paper to make the part visually stand out out of the black background that our group established. I think that I should’ve numbered my materials better and kept them in chronological order if it were a more precise animation and plan that I’m following. It could’ve gone better if I put wire at the back of the blue waves rather than acetate and my hands to hold them. However, I found that if I place the acetate in a sturdy position (folding it over twice), I could have the star float like I anticipated it to.
I think that the acetate added to the animation when I put a large curved sheet of it for the background particles – since it warped the reflections of the foreground – and contributed into the visual element of my part overall. I’m also quite intrigued with the way shadow plays a part in creating depth within the space.
My contribution to the project
In terms of team work aspects, since we had 7 people within the group with only 3 hours to spare, we decided to split the group into 2, where I was the middle. Knowing that there are 3 more people needing to make their part and me spending already 1/2 of the time allocated, I did rush a bit around the end. In terms of teamwork, we all discussed our main plan and structure, before creating our own individual parts. We would end with someone’s starting shape and we kept it very flexible.
[Proper feedbacks and reflections in the next post:]
We were introduced to the idea of 3D forms and team work in morphing our shapes into each other. My transition was from square to triangle.
In terms of teamwork, there was constant communication and ideas thrown around for all of our shapes. There were some mishaps on who is doing which transition but this was easily handled. During our shooting process, we each took turns taking pictures for our peers so that it’s a faster process with less changes in lighting shifting into different position. It also help decrease tripping hazards from going back and forth.
Brief page in my sketchbook for the rotation: I like rewriting briefs in summary so that I can stay on track
CUT OUTS
The main structure of the cut-out I made redrawn (since I didn’t take pictures of the cutting process)
RESPONSE TO THE ANIMATION:
Due to the fact that I didn’t managed to take photos of the cut outs (they were mostly improvised after a brief discussion with the group), I’ve redrawn this diagram of the shapes I’ve cut out. To include both displacement and replacement techniques within my work, I rotated and prolonged certain shapes for a certain amount of frames. This is so that it not only matches the momentum of the last classmate’s animation, but also limits the amount of frames I need to cut and replace in the exact position.
To improve, I could’ve maintained the momentum and arc of the projectile further, and use the space on the left to follow the motion through. I could’ve also experimented with the placement and depth of focus, rather than sticking to one horizontal axis that the paper is travelling in. Nonetheless, I think the rip in the diamond to a triangle somehow gave some reality and texture of the material and was a somewhat smooth animation. The way that it rips created a 3 dimensional around itself.
In my next stop motion project, I’ll attempt to use the space around the shapes more, and create something ambitious with different materials and shapes as similarly to Selina Trepp’s “Working the flow” (depending on the time restraints) – where she adds many creature-like elements and simultaneously move them to create a lively atmosphere using displacement animation.
I’ve collected feedback within tutors, class mates and also my relatives outside of University as well. In this post I’ll document the feedback, and a final evaluation of the rotation.
FEEDBACK FROM PEOPLE:
A group member’s helpful notes during the discussion:
With this feedback, I should slow down the movements of the star and prolong it’s frames next time.
Feedback from another group:
For these feedback, I think the only feedback that is semi related to my work was the comment about the lines, since I also included them in a part of my animation.
Feedback from my parents:
They told me that this part in my animation should be somewhat slowed down. But I think that if I slowed that particular part in post production, it looses part of the grungy choppy flashes of colour and texture. To respond to the sound, I wanted to feel as if the animation is hard to catch up to with a lot of things happening at once. But I think I could’ve still added a few more frames to establish it.
PERSONAL REFLECTION:
A few artists and notes I took whilst discussing my part with tutor:
There was a few points that were discussed that got me thinking.
QUESTIONS I WANT TO EXPLORE:
How much control do we have over the project and the outcome, do we need to control everything rather than be experimental? Would it loose some parts of the magic if the sync didn’t happen unexpectedly?
When I was being very experimental by cutting out literally any piece I could, would I have lost the structure I was mainly planning on making? Or would I make something completely different, special and improvised?
ARTISTS INSPIRED AND LINKED TO MY WORK:
I looked into Selina Trepp’s “Working the flow” where the motions of the figures runs consecutively all at the same time. I wanted to make my part look quite dynamic and vivid in the composition.
WHAT WENT WELL:
We were consistently practicing our teamwork and communication skills even after dividing up workload. Despite all of us having different skill levels in English, our team managed to create something with a balanced contribution and with a somewhat clear understanding of how we would execute this plan.
Since I had some experience in stop motion prior to this, I wanted to focus more on the extent of how I can play around with the timing, textures and elements to make the sound feel more vibrant and alive. Using the responsive sketch we had made before, I took elements of this and turned them into multiple thumbnails which helped me understand how many ways I can structure elements and transitions. During the group discussion, since we were a big group, we reached the conclusion of dividing up 2 workspaces to get work done twice as fast – but have enough continuity in the backgrounds to merge them together. Since I was the person starting halfway, I had to configure a lot of backgrounds and placings to match the first team’s and also make it easier for Jacob (the person going before me) to transition his work to mine.
Rather than cut out specific shapes that I was going to replace at specific times and frames, I made things easier for me by just cutting out shapes that felt right to me, and keeping the structure loose. This gave me freedom to completely do what I want during the shot.
IMPROVEMENTS:
To improve, I could try to make a more precise and structured work rather than trying to improvise everything completely. I could also preplan the exact pieces I need instead of making extra bits and pieces. I think we could’ve also communicated more as a team whilst working on our parts so that in a way, we could integrate each of our parts together in the same time.
Overall, this was a very interesting experience and a great start to working with a team.